
![]()
![]()
This is a step-by-step illustrated guide to replacing the VVT actuators (solenoids) to fix the Chrysler 2.4 liter "World Gas Engines" (WGE) before MultiAir was added. This covers Dodge, Jeep, and Chrysler cars from around 2006 onwards; our test case was a 2007 Chrysler Sebring. The earlier 2.4 liter Mopar engine (Neon-based) doesn’t have variable valve timing, and the MultiAir system worked rather differently. It should work on the WGE 2.0 liter engines, too.
The process here resolves OBD II error codes (DTC) P0016, P0017, P000A, and P000B. We had P000B. According to Chrysler’s technical service bulletin (TSB) 18-018-07 Rev A, issued May 30, 2007, the firmware upgrade is only needed for Compass/Patriot/Caliber made before February 20, 2007 or Avenger/Sebring made before March 5, 2007. The exact same process works for the 1.8, 2.0, and 2.4 liter engines. The bulletin notes that the codes may come up very sporadically. The swap takes 42 minutes, “book time”—for both actuators / valves.
Thanks to Allpar’s ImperialCrown for remote guidance! This is not a difficult job even for a mechanically mediocre person like me. I can (usually) change spark plugs and tune carburetors, but anything beyond that is usually a problem. In short, I'm not a born mechanic.
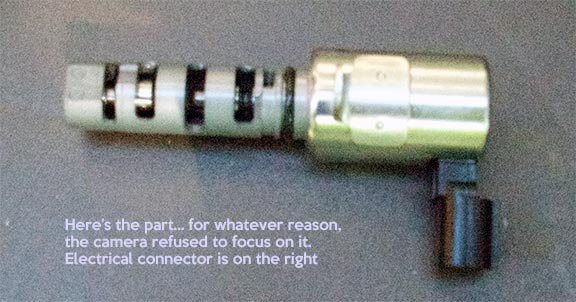
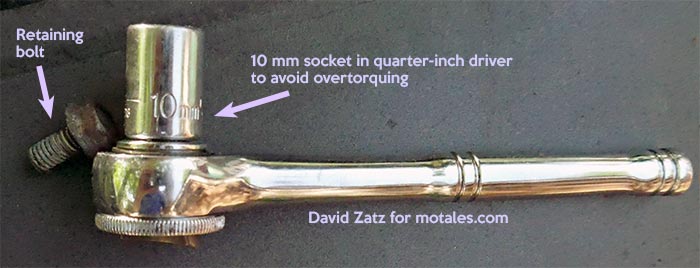
First, you will need a new actuator, around $30 from RockAuto—make sure you get the correct model, since the exhaust actuator is slightly different, incorporating a spring (which isn't readly visible). It's best to replace both at once. You will also need a 10mm socket for your socket wrench, and preferably a vice-grips for reasons that will become obvious soon. There is a service bulletin for the error codes which suggests replacing both sensors, both actuators, and the oil (making sure you use the correct recommended grade, not the alternative in the owner's manual), and then reflashing the computer. This may have been done in the past, though!
In our case, we just had one code—bad sensor for the rear VVT—so we replaced both sensors, and when that didn't work, the actuator. For reasons that will be clear, that seemed to be the right move. (The code we had, P000B, was "Bank 1 Camshaft 2 Position Slow Response," which indicted the sensor. It was in fact the actuator. Code P000A is Bank 1 Camshaft 1 Position Slow Response; cam 1 is intake, cam 2 is exhaust. There is only one bank because this is an inline four, not a V-engine. P0016 and P0017, the other two possible codes, are Crankshaft - Camshaft Timing Misalignment for Sensor 1 and Sensor 2, respectively.
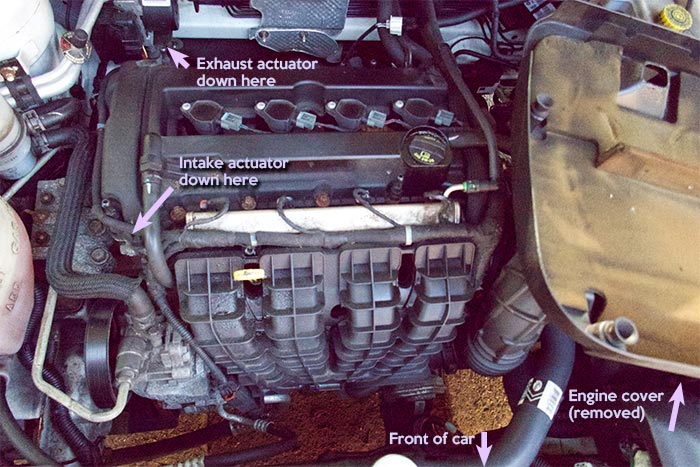
To actually do the actuator swap (for either intake or exhaust), first remove the engine cover, that big plastic thing that lifts right off if you apply enough force. It has little holes for the dipstick and oil cap. If you got your car used, you may not even have one. It’s the thing that has the name of the engine on it.
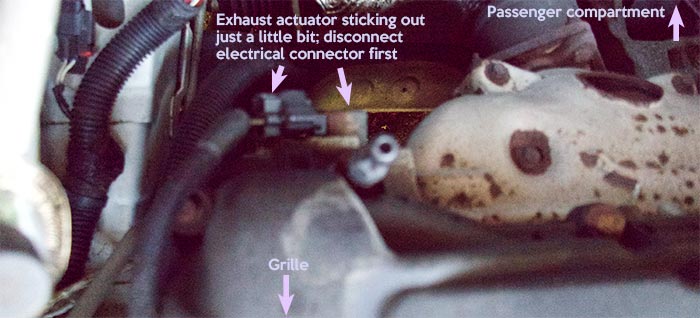
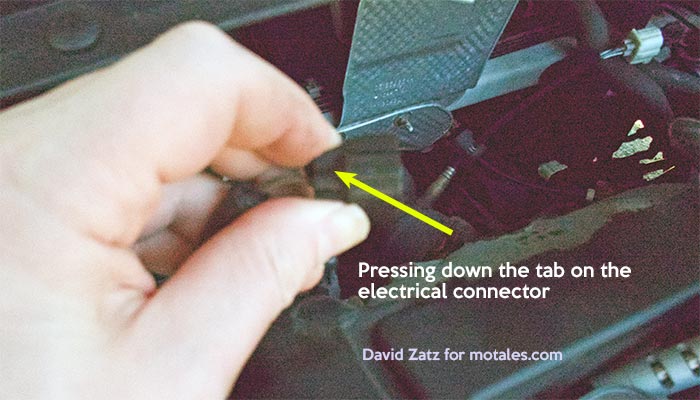
Now, go to the passenger side of the car, assuming you’re not in the UK, Australia, or New Zealand, and look at the back of the engine (the part on the cabin side). You should see, right near the top, the end of the actuator poking out. Gently press in the clip on the electrical connector going to the actuator; it's a lever sort of thing, so if you have your finger in the right place, it's easy to release the clip. Once the clip is pressed in all the way, it should be very easy to gently tease the connector off. Make sure you don't pull on the wires!
The next part requires you to find, with your finger, the bolt that holds the actuator in. Once you've found it with your finger, it should be easy to find it with your 10mm socket. It took a good deal of force to break it free, using the smallest socket wrench I had, but once free it moved easily enough for me to take it out the rest of the way with my fingers. That's the ideal, since if that bolt drops, it's very hard to find again.
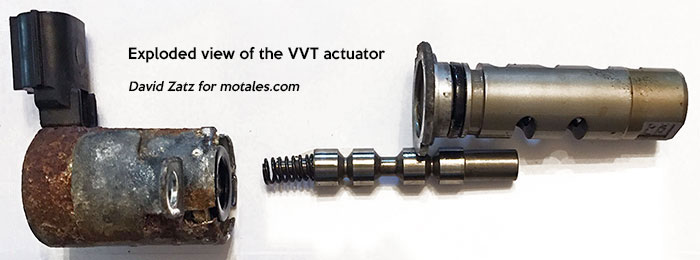
Now came the part that convinced me the actuator itself was bad. The bolt was completely out, the cord was disconnected; and I gently tugged on the actuator, hoping it might pop right out. Instead, the top of it popped right off, leaving the rest in the car. I nearly panicked at that point, but I felt around and found a thin rod; I pulled it out around an inch, and then it stopped. It was smooth and covered in oil, so out came the vice grips. Some serious gripping and leveraging later—the inner rod part of the actuator came out, by itself.
I thought I was sunk at that point, but I reached in and the rest of the actuator came right out with no fuss. That was the second biggest surprise of the project!
From there, I just had to put in the new actuator, which was pre-oiled from the factory; screw in the bolt very carefully using my fingers, then the socket wrench—there is a factory recommendation for torquing it, but I gave it a reasonable amount of pressure from the middle of the wrench to avoid overtorquing it. Finally, I put on the connector and started the engine; it started right up, and the code (which I had erased using an OBD tool) did not come back. I tried revving the engine and it seemed fine, so I put the engine cover back on, cleaned up, and came inside to write this.
Two more notes: this problem can also be caused by dirty screens (there are screens that protect these parts, which are not meant to be cleaned; you need to remove the head to do it), and by using the wrong grade of oil. The manual on our car says to use 5W20, with 5W30 as “also acceptable.” Never use “also acceptable” unless you are in dire need, which is not likely, since 5W20 is also used on Hemi V8s
This is a reasonably easy and cheap repair.
Guest insights at Motales: sales, parts, factory
Updated: 300,000-Dart re-recall and many Ford callbacks
Barra mitigates tariffs, sees big GM profits
Copyright © 2021-2025 Zatz LLC • Chrysler / Mopar car stories and history.
YouTube • Editorial Guidelines • Videos