
![]()
![]()
Congratulations! You have just acquired a classic car or decided to tune your old car yourself. If you don’t have a multiple-carburetor setup, this is a fine decision. If you do have more than one carburetor on the car, this guide may not be enough.
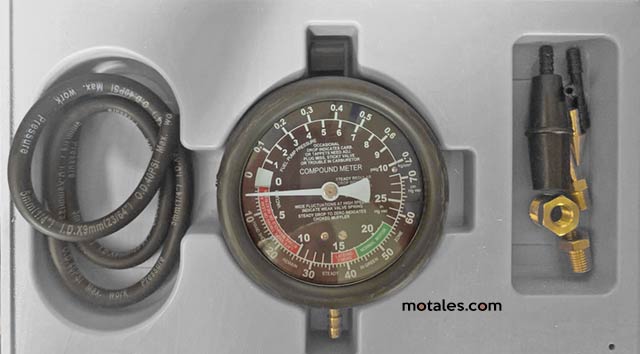
But first: let’s prepare. You will need a tachometer and perhaps a vacuum gauge; ideally you will have an exhaust gas analyzer or an oxygen sensor you can read from your cellphone. You will also need a slotted screwdriver. The illustrations in your service manual may be wrong if it’s not a factory manual, since they tend to blur models and years together.
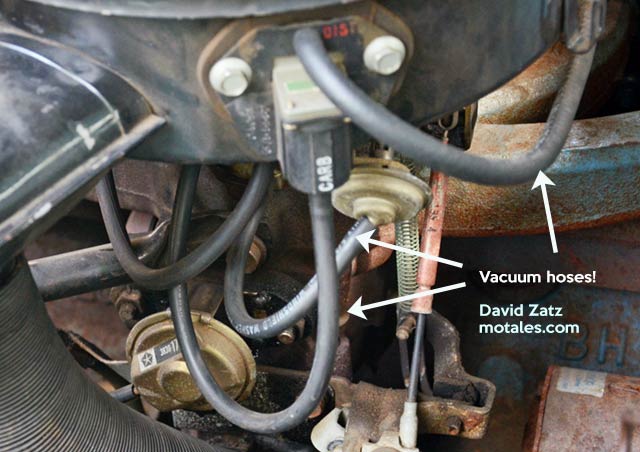
First, make sure your vacuum hoses are correctly set up and not leaking (a more common problem as the years progressed in the 1970s and 1980s). Leaking or misrouted hoses are a major problem, especially if someone has tried to “get ridda that gummint emissions stuff,” making mistakes and eliminating important items (spark advance) as well (in some cases lack of spares can make this less irrational).
One common exception is running the hose past the OSAC (orifice spark advance) controller on the firewall, if you have one; doing this likely won’t hurt performance or emissions much, if at all. The OSAC devices tend to get clogged fairly quickly.
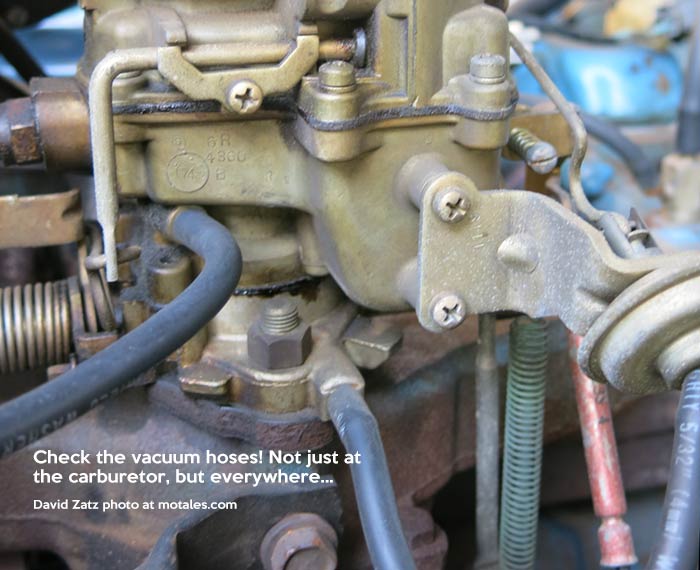
Replace cracked or missing hoses and check the routing against the service manual or underhood stickers. You may need hoses rated for carrying gasoline or emissions fumes, depending on which ones need to be replaced.
Warm the car up by driving it around for a bit (not by letting it idle), then shut the engine and connect the vacuum gauge to intake vacuum. Make sure you use a port that supplies vacuum at all times; Bob Lincoln suggested using the vacuum choke pulloff, a round metal case on the driver’s side of the carburetor, if the car has one—and steering clear of the brake vacuum. If you want, you can use a cheap hose tee (shaped like a T) and run it into the cabin so you can install a vacuum gauge for later diagnostics or to adjust your driving style. We will have a section on vacuum-based diagnostics later; in this process, you will be trying to get the highest possible vacuum by adjusting the carburetor.
Before starting, if you have a vacuum timing advance, as most cars without Lean Burn computers do, you will need to plug the vacuum port leading to the advance first. This is shown in the service manuals. A golf tee works well for this.
In theory, you should set the timing before starting on the idle mixture; if you have points (dropped from Chrysler products in the early 1970s) adjust the dwell, too.
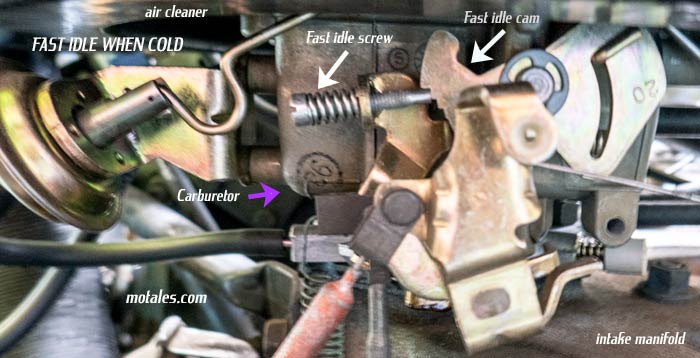
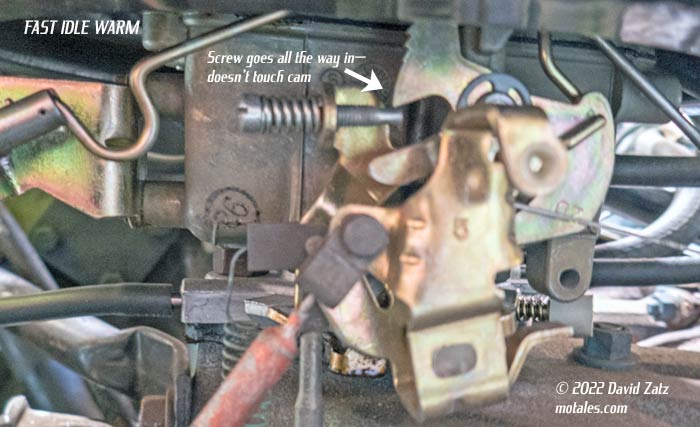
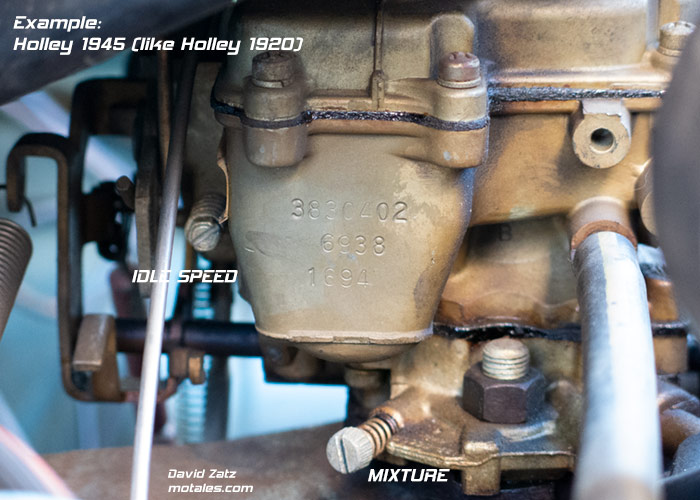
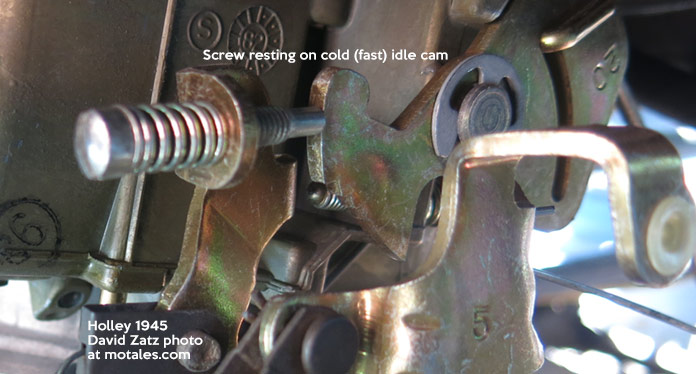
The car must not be running on “fast idle” when you adjust the fuel mixture and idle speed. In older carburetors, such as my 1974 Holley 1945 and the Holley 1920 before it—and the Carter BBD of the era—a screw rests on a cam (disc with steps cut out) when the car is cold. That screw is turned to set the “cold idle” speed, so that when you first start the car, the engine runs faster and does not stall as easily.
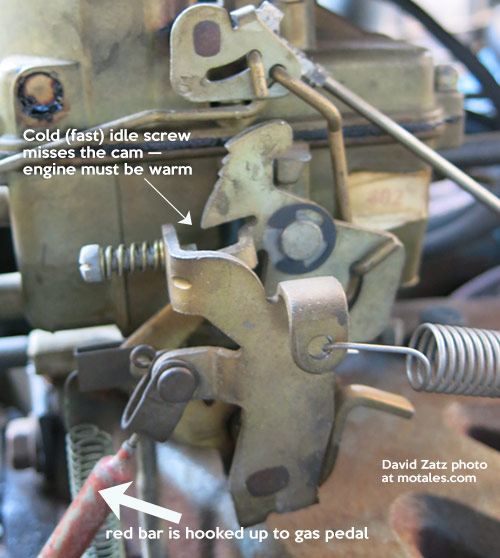
As the car warms up, the cam moves so the idle slows more and more, till it reaches the warm idle setting and the screw hits empty space. There is a separate screw for setting the warm idle (usually called “curb idle”). This assumes that the “heat riser,” which actually moves the cam, is working properly. We’ll get into that later.
For the fast idle, I tend to use the trial and error method rather than factory specs, because I like a slower warm idle in the summer—and because it’s easy on my car to reach the screw.
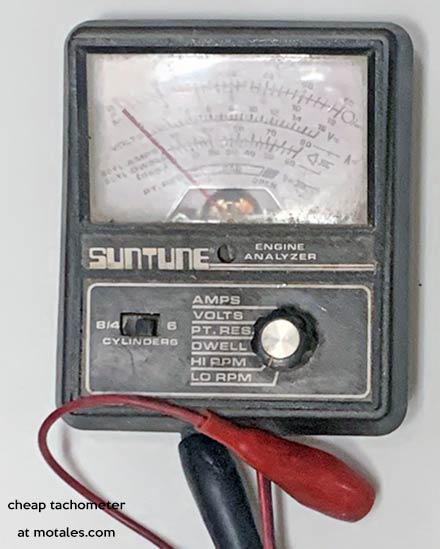
Before and after setting the idle mixture is set, set the idle speed using the tachometer. A typical tachometer has two wires. Read the instructions! My inexpensive and rather old tachometer has a positive (red) wire that clips to the negative coil pole. The coil is usually a black cylinder connected to the distributor cap by a single, well insulated, thick wire that plugs and unplugs (with some force).
The other tachometer cable (in my case) attaches to a ground, such as the negative battery terminal or a clean, exposed, unpainted, unrusted part of the body itself. Yes, both cables connect to “negative” places. Once both cables are securely fastened, restart the engine—assuming you haven’t taken a long, long time to do the tachometer connections.
Now we have to find the warm (curb) idle speed, which may be hidden or hard to find in late-1970s and especially in 1980s carburetors. For the moment, we are ignoring the fast idle screw (the one that hits the cam). Once you find it, turn it in to speed the idle and out to slow it, until you have reached the speed on the sticker under the hood or in the specifications book. In my own car it’s possible to do this with the air cleaner on, and that’s what I do. If you can’t adjust it with the air cleaner on, replace the air cleaner before finishing to make sure the idle speed is still correct, because airflow is more restricted with the air cleaner attached. (Replacing the air cleaner at this point might be a good idea anyway.)
The tradeoffs in the idle speed are these:
By now you’ve set the idle speed. Pete Kranz pointed out that, if your curb idle is too fast when you try to set the mixture, your throttle plate will be open and cannot draw from the idle circuit, rendering any adjustment ineffective. That's a common mistake.
Each barrel of the carburetor has its own idle mixture screws; single-barrel carbs, the most common on straight sixes, have a single screw. So do “progressive opening” two barrel caburetors. Other two-barrel carbs, as well as four-barrels, have two mixture screws (but still just one idle speed screw). Generally single-barrel carburetors were used by Chrysler in North America only on pre-WWII four-cylinders and in-line six-cylinders; two-barrels were used on some sixes starting in 1977 and four-cylinders starting in 1981; and four-barrels were reserved for V8s, except for the rare Hyper-Pak six-cylinders. If you have one of these, you will probably not be reading this. South American slant-six cars often had dual single-barrel carburetors. Australian cars could have one or more Weber two-barrel carburetors, or any mix of American style carburetion.
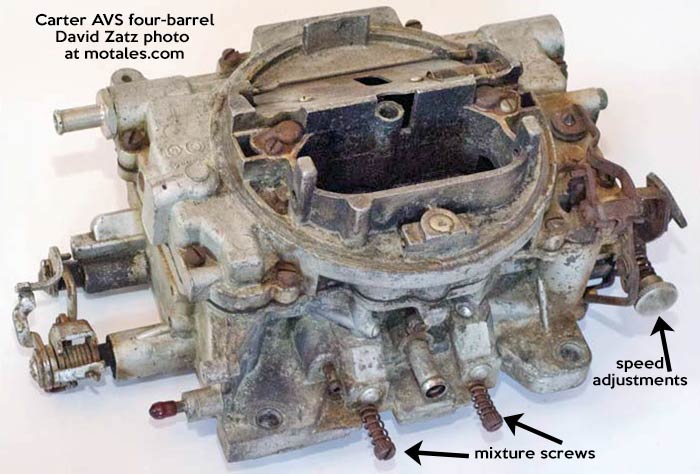
Idle mixture screws often have a spring to increase friction, which prevents movement. In the 1980s they started putting in plastic screw limiters or even plugs to prevent people from changing the mixture too much. “New old stock” carburetors may still have these, and you can remove them if needed; they were meant to stop people from making the mixture too rich.
Peter Kranz added: “Idle air mixture screws were sealed with a lead plug after around 1980. Mechanics back in the day would drill the plugs out to access the mixture screws. If your carb is in really good condition or was completely rebuilt (new throttle plate bushings, top and bottom plates resurfaced, etc) you could leave the plugs in, if the carb and engine are original to the car, and nothing else has been modified. It should run quite well. Oftentimes, however, as the vehicle ages, it requires just a little more fuel, but you can still set everything up pretty lean and still cone out okay.”
The goal for us is to make the idle mixture produce the highest possible vacuum (or, if you don’t have a vacuum gauge or if the reading bounces too much, the highest possible rpm). Various wear issues make the vacuum bounce around, but do the best you can. This should not take a long time—maybe five or ten minutes per mixture screw, remembering to make each adjustments on both screws at once if you have a two or four barrel. If the idle mixture screw doesn’t seem to do anything, the carburetor may be clogged; then you have to clean it before proceeding (which is beyond our scope).
Most guides suggest turning the screw(s) all the way in and then backing both out by a certain amount, e.g. 1.5 turns, to make sure they are set the same way. Some suggest turning them in until the car all but stalls, one at a time and slowly, then backing them back out again.
Don’t turn the screw(s) too far before checking for changes; the engine needs time to react. Bob Lincoln recommended moving the screw 1/16 turns at a time.
Once the vacuum (or rpm) gets as high as you can get it, turn in the screw(s) by a quarter turn (to avoid having the mixture too rich) and shut the engine in preparation for the next step.
Pete Kranz (who wrote this section) pointed out that an adjustable timing light is equally valuable on a Lean Burn car, especially one with an electronic tach readout. (Lean Burn was phased into Chrysler cars throughout the 1970s and stayed on, in various forms, to the end of carbureted engines.) ESA/EFC cars (most 1980 RWD cars, all post-1981 cars) used the Idle Control Solenoid for both curb and step-up idle settings—so to adjust the curb idle, you remove the spring-loaded screw and use an Allen wrench. ThermoQuad and Quadrajet carbs also use a spring-loaded screw to adjust the secondary air door. V8 models through 1984 used the intake-mounted choke thermostat, as did all 1985-1989 two-barrel LA (318, 360) engines. The 1985-1989 Quadrajet has an adjustable integral choke thermostat.
I generally set the fast (cold) idle speed, which is controlled by the screw that lands on a cam (as described earlier), a few times a year to match temperature changes; the colder it gets, the faster I want the fast idle, within reason.
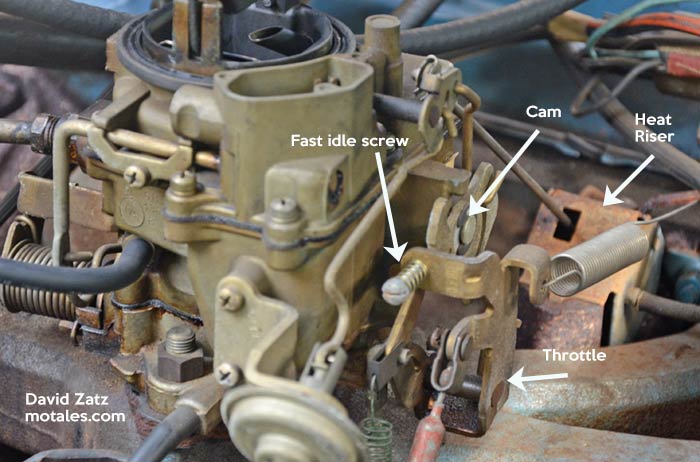
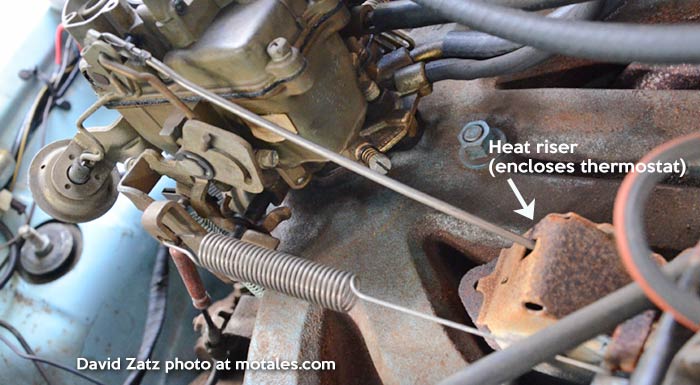
The cam is connected in most cars by a heavy wire to a spiral “bi-metal” thermometer (a loosely wound spring which has a two-layer metal sandwich, with one metal on one side and a different one on the other); the difference in the metals’ rate of contraction as the temperature changes makes the screw tighten as it gets colder, pulling the cam.
As the car warms up, the cam turns and the screw lands on the various steps, slowing the idle, until it finally misses the cam entirely and you are using the other, warm-idle screw for the idle speed. That said, the cam only turns when you hit the gas—otherwise it’s held in place by friction—so if you leave the car idling and don't touch the gas pedal, it will just keep racing.
The assembly that includes the thermometer is called the heat riser; on later engines it has a (usually rusted) metal shield around the thermometer intended to cause faster action, which saves fuel and cuts emissions. It may need to be lubricated or replaced if the car stays on either hot or cold idle as the engine warms up. Some engines and years seem to be more prone to this than others.
Pete Kranz added: “If you have the engine tuned properly, 1200 RPM (fast idle) should be plenty. If it’s –20° out, racing any cold engine at a higher speed will cause severe damage. Oil doesn't flow very well in those temps. Proper starting procedure, fresh fuel, and a strong battery will be the key to getting it to start quickly and stay running without high engine speed.”
Adjusting the float level is not covered on this page, but may need to be done now and then. Adjusting the float level can only be done by taking the carburetor bowl (or the entire carburetor) off, which means (a) dealing with gasoline and (b) replacing a gasket. The float height is specified by the carburetor and car makers.
Floats fail over time and always have; brass floats tend to work well with modern fuels. Walt McCrystal, a longtime Chrysler service technician, noted that the plastic floats take on fuel over the years, gain weight, and sink. He also wrote that brass floats can be diagnosed by taking and drying them out and shaking them next to your ear; anything loose inside is probably dried fuel from a leak. He wrote, “It only takes a pinhole” for them to leak and fail.
If the idle speed is wrong when warm—if it races (the engine runs too fast) or if it stalls easily—the warm idle speed has to be adjusted. If it stalls or races when cold, adjust the cold idle. Both speeds are specified by Chrysler.
There are some carburetors which must be adjusted in different ways, such as the Carter WCFB; on this model, fast idle is adjusted by bending the linkage according to feeler gauge readings, for example. Idle mixture is set while the engine is at 500 rpm.
Cars made before the mid-1970s must also get points adjustments, though many or most people retrofit these cars with electronic ignition. The timing must also be adjusted now and then—rarely for parade or show cars—but it is fairly easy. On engines without hydraulic valve lifters (tappets), the lifters also have to be adjusted; the last Chrysler engines to require these adjustments were the 1974 slant sixes. Even the 426 Hemi changed over to hydraulics.
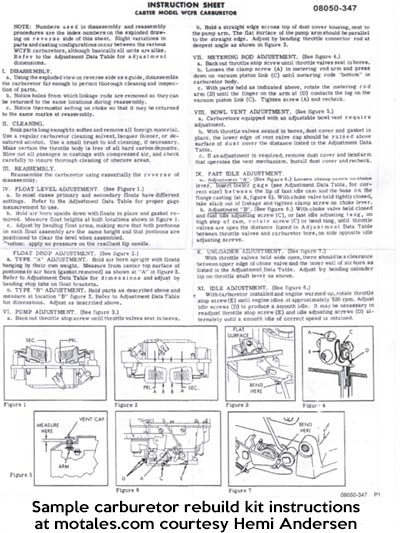
Carburetor rebuild kits are still available from RockAuto and other places. Some believe it makes more sense to rebuild a “known good” carburetor than to buy a used or rebuilt one, because some of the used and rebuilt stock is getting rather worn. You can still get a good used or NOS carburetor but rebuilding isn’t too hard.
Walt McCrystal, former service tech, has a few points of advice:
Metering rods are generally for fine-tuning mixture at cruise. I was always taught never to monkey with it, but you can lean it out for summer, and put it back in for winter. Secondary adjustments are only used if there’s a bog (pause/stumble) at wide open throttle (“pedal to the metal”); if that happens, you just tighten it up a smidge. That's how Chrysler got away with 800 CFM Thermoquads or 750 QuadraJets on the later 318 squads.
Accelerator pumps can also be adjusted, to an extent, to rectify a bog off-idle, but timing plays a factor in that problem, too. That's usually the last adjustment to make, because once you get everything else set, if you still get an off-idle hesitation, it can only be one thing—the accelerator pump.
Two other common issues, erratic performance when cold and stalling or no-starts while hot, are related to the choke and fuel delivery system. The choke on the Carter carbs need to be checked every oil change, as they had to be set just right to work correctly, and the ThermoQuad had a tendency to lock up in fast idle if it wasn’t kept in proper adjustment. The QuadraJet was harder to set initially, but was much easier to keep in spec.
Vapor lock was common in most post-1975 carbureted cars. Chrysler devised several methods of alleviating the problem, including vented fuel tanks, return lines, bowl vents, fuel vapor canisters, and eventually the low-powered electric in-tank fuel pump used in series with the engine-mounted mechanical pump on later M-body squads. The most important thing is to ensure that whatever system you have, the lines must all be intact and clear. The filter must have the correct return line nipple, and should be properly oriented for correct fuel flow. It’s definitely not a good idea to eliminate any of the fuel vapor containment system, as it actually enhances performance and fuel economy.
Finally, most models had a “pre-heater,” which was little more than a tin shield mounted to the left exhaust manifold, routed up to the air horn on the air cleaner via a flexible foil tube. Just like so many other design features, this is usually tossed by the younger crowd until they wonder why their car runs so poorly when it’s cold. The idea was to preheat the air coming into the carb. It was thermostatically controlled, so when the air reached a certain temperature, the vacuum servo on the air horn closed, and regular cold air was allowed on. Silly today, but for what it was, it did help.
We will cover timing in a later story.
Canadian sales drop 8% in Q3, 12% so far in 2025
Another Wagoneer flying-trim recall and what it means
Stellantis swaps CFOs, bringing back Laranjo
Copyright © 2021-2025 Zatz LLC • Chrysler / Mopar car stories and history.
YouTube • Editorial Guidelines • Videos
Tailfins Archive • MoTales on BlueSky